Why Choosing the Right Mortar Matters for Your Rock Wall
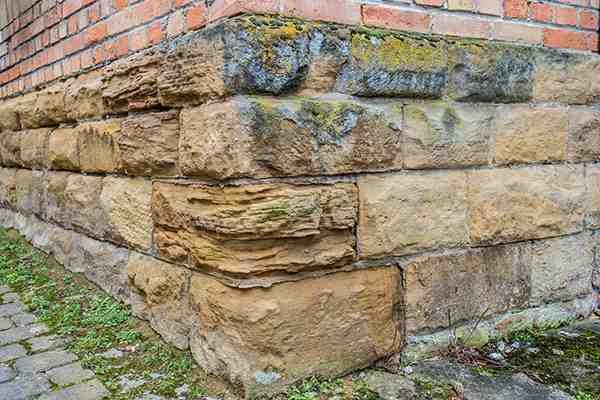
Building a rock wall that lasts requires more than just stacking stones. The best mortar mix for rock wall construction is the key to durability, bonding stones, sealing out water, and allowing for subtle movement without cracking. The right choice ensures your wall withstands New England’s freeze-thaw cycles for decades.
The two most common options are:
Type S Mortar: A high-strength mix (1,800 psi) for load-bearing retaining walls and below-grade use.
Type N Mortar: A medium-strength mix (750 psi) for decorative, non-load-bearing walls above grade.
The ratio of cement, lime, and sand dictates the mortar’s strength and workability. Using a mix that’s too strong can damage softer stones, while one that’s too weak will fail.
I’m Joe Gerrior, owner of Gerrior Masonry & Landscape Construction Corp. With over 34 years of experience building walls in Massachusetts, I know that matching the mortar to the stone, project needs, and local climate is crucial. In this guide, I’ll share what you need to know.
Choosing the Best Mortar Mix for Your Rock Wall
When building a durable rock wall, the mortar is the unsung hero holding it all together. But with several options, how do you choose the best mortar mix for rock wall construction? Let’s compare the most common types.
Understanding Mortar Types: Type S vs. Type N
Mortar types are classified by ASTM standards based on their compressive strength. For rock walls, we primarily use Type N and Type S.
Type N Mortar: A general-purpose, medium-strength mortar with a compressive strength of around 750 psi. Composed of 1 part Portland cement, 1 part lime, and 6 parts sand, it’s the go-to choice for most non-load-bearing, above-grade walls like decorative garden features or veneers. Its higher lime content gives it excellent flexibility, allowing it to accommodate subtle movements from thermal expansion and contraction. This makes it particularly suitable for softer, more porous stones, as it won’t overpower and crack them. You can find pre-mixed bags of medium-strength Type N mortar at most hardware stores.
Type S Mortar: A high-strength mix with a minimum compressive strength of 1,800 psi, designed for serious durability. Made from 2 parts Portland cement, 1 part hydrated lime, and 9 parts sand, it offers superior bond strength compared to Type N. This robust adhesion is critical for load-bearing structures like retaining walls, which must resist immense lateral pressure from soil and water. We recommend Type S for foundations, any wall built below grade, and structures exposed to heavy loads, high winds, or the intense freeze-thaw cycles common in New England. Look for high-strength Type S mortar for these demanding projects.
Other mortar types exist for specific uses: Type M (2,500 psi) is the strongest available, but its high cement content makes it extremely rigid and less workable. While used for heavy-duty foundations, it’s often too hard for most rock wall applications and can cause softer stones to fail under stress. At the other end of the spectrum, Type O (350 psi) and Type K (75 psi) are very soft, high-lime mortars. They are primarily used for repointing and restoring historic masonry made with soft, handmade bricks or delicate stone, where a sacrificial, highly breathable mortar is needed to protect the original material.
Here’s a quick comparison of Type S and Type N:
Feature
Type S Mortar
Type N Mortar
Strength (PSI)
Over 1,800 psi
Around 750 psi
Mix Ratio
2 parts Portland cement, 1 part lime, 9 parts sand
1 part Portland cement, 1 part lime, 6 parts sand
Best Use Cases
Load-bearing walls, retaining walls, foundations, areas with high winds
Non-load-bearing walls, decorative garden walls, exterior walls in mild exposure
Grade Level
Above- and below-grade applications
Above-grade applications only
Key Ingredients and Their Ratios
Understanding mortar’s components—Portland cement, hydrated lime, sand, and water—is key to a successful mix. The ratio of these ingredients determines the mortar’s final properties.
Portland Cement: This is the primary binder that provides compressive strength. The more cement in the mix, the stronger and faster-setting the mortar will be, but it will also be more rigid and less permeable.
Hydrated Lime: Lime is the magic ingredient for workability and durability. It makes the mortar smooth, sticky, and easy to spread. Crucially, it adds flexibility, helps the mortar self-heal minor cracks over time (a process called autogenous healing), and increases vapor permeability, allowing trapped moisture to escape. This “breathability” is vital for the long-term health of the stone. You can learn more about the benefits of lime in mortar.
Sand: Sand acts as the aggregate, providing bulk and preventing excessive shrinkage as the mortar cures. It’s critical to use clean, sharp, well-graded masonry sand (meeting ASTM C144 standards). “Well-graded” means it contains a variety of particle sizes, which fit together tightly to create a dense, strong mortar. Never use play sand or beach sand, as their rounded particles and potential salt content will create a weak, unreliable mix.
Water: Water is necessary to activate the chemical reaction (hydration) that gives cement and lime their binding properties. Use clean, potable water. The amount is critical; too much water creates a soupy mix that drastically reduces strength, while too little makes it unworkable. The goal is a smooth, buttery consistency that holds its shape on a trowel.
A common, versatile ratio for many rock walls is 1 part cement, 1 part lime, and 6 parts sand. This is the recipe for Type N mortar.
Special Considerations for Your Rock Wall Project
The right mortar depends on your wall’s purpose and environment.
Freestanding vs. Retaining Walls: Decorative freestanding walls generally only need the flexibility of Type N mortar. Retaining walls, however, are engineered structures. They must withstand immense lateral soil pressure and hydrostatic pressure from groundwater, which is magnified by freeze-thaw cycles. This requires the superior bond strength of Type S mortar, along with a proper concrete footing, robust drainage systems (like gravel backfill and perforated pipes), and weep holes to relieve pressure.
Load-Bearing Needs: Any wall supporting a structure, such as a porch roof or an upper floor, is load-bearing and requires a high-strength mortar like Type S to ensure safety and stability.
Below-Grade Applications: Any portion of a wall below ground level will be in constant contact with moisture and soil. It must be built with Type S or M mortar to resist water penetration and the pressure of the surrounding earth.
Stone Type: A fundamental rule of masonry is that the mortar should never be harder than the masonry unit. Porous stones like sandstone and limestone need a flexible, breathable, lime-rich mortar (like Type N) to prevent moisture from getting trapped, which can lead to spalling (flaking or peeling of the stone face) during a freeze. Dense, hard stones like granite or basalt can easily handle stronger, cement-heavy mortars like Type S.
Mortar Color and Joint Appearance: The final look is heavily influenced by the mortar. Color can be customized with pigments or by choosing different colored sands. The joint profile is equally important for both aesthetics and performance. A concave or V-joint is excellent for shedding water, while a raked joint creates deep shadows but can collect water. A flush joint provides a rustic look but offers less water resistance. For more ideas, see our stone wall services page.
How to Find the Best Mortar Mix for a Rock Wall
You can use pre-mixed bags or mix your own for greater control and cost savings on large projects.
Pre-mixed Mortar: Convenient and consistent. Just add water to a bag of Quikrete Type N or S.
Mixing Your Own: More economical for large jobs and allows for customization. A good starting point is 6 parts sand, 1 part cement, and 1 part lime.
Prepare: Use a clean wheelbarrow or mixing tub. Lightly dampen the stones with a hose or spray bottle. This prevents the dry stones from wicking essential moisture out of the mortar too quickly, which would result in a weak bond.
Mix: Combine all dry ingredients thoroughly before adding any water. Add about two-thirds of the estimated water, mix, and then add the remaining water gradually. Mix for a minimum of five minutes to ensure all components are fully integrated and you reach a smooth, thick, peanut butter-like consistency.
Apply: Use a pointing trowel to apply a full 1-inch-thick bed of mortar onto the previous course of stones.
Set Stones: Press each stone firmly into the mortar bed with a slight twisting motion to ensure full contact and a strong bond. “Back buttering” the stone (applying mortar to its bottom surface) can also help. Fill all vertical joints completely to ensure the wall is solid.
Tool Joints: Wait until the mortar is “thumbprint hard”—firm enough to hold a thumbprint without smearing. Then, use a jointing tool to compact the mortar, creating a dense, weather-resistant surface and a clean, professional appearance.
Cure: Proper curing is critical for strength. Protect fresh mortar from direct sun, wind, frost, and rain for at least 72 hours. In hot, dry weather, gently mist the wall with water periodically to slow evaporation and allow the cement to hydrate fully. Only mix as much mortar as you can use within about 90 minutes.
Common Mistakes to Avoid When Choosing the Best Mortar Mix for a Rock Wall
Avoiding these pitfalls is key to a long-lasting wall.
Using Mortar That’s Too Strong: This is the most common error. A mortar that is harder than the stone will not allow for natural movement, transferring stress directly to the stones and causing them to crack or spall. The mortar joint should be the sacrificial element, not the stone.
Incorrect Ratios or Improper Mixing: Guessing at measurements or adding too much water is a recipe for disaster. An overly wet mix will be significantly weaker, more prone to shrinkage cracks, and less durable. Use buckets for consistent volume measurements.
Ignoring Weather Conditions: Applying mortar in freezing temperatures will cause the water to freeze and expand, destroying the mix before it can cure. Extreme heat and wind can dry it out too quickly, halting the hydration process and preventing it from reaching full strength.
Forgetting About Drainage: Especially for retaining walls, failing to install a proper drainage system behind the wall is a critical failure. Hydrostatic pressure will build up and can push over even the strongest wall. Mortar alone cannot fight back against immense water pressure.
Not Considering Stone Porosity: Using a dense, low-permeability mortar (like Type M or S) with a porous stone (like sandstone) traps moisture inside the stone. When that moisture freezes, it expands and blows the face off the stone.
Using the Wrong Product for the Job: Never use concrete mix, thin-set tile mortar, or other adhesives in place of proper masonry mortar. These products have different properties and are not designed for building a structural, weather-exposed rock wall. Always match the mortar type to the project’s specific demands.
Build a Rock Wall That Lasts a Lifetime
Choosing the best mortar mix for rock wall construction is critical for a long-lasting, beautiful result. By matching the mortar type—strong Type S for retaining walls or flexible Type N for decorative ones—to your specific stone and project needs, you ensure structural integrity. Understanding the roles of cement, sand, and especially lime, which adds flexibility and breathability, is key.
Proper mixing, application, and avoiding common mistakes like using a mix that’s too strong or ignoring weather conditions will prevent future failures. While DIY is an option, professional craftsmanship guarantees a rock wall that not only looks stunning but also endures for generations. With over 30 years of experience, the skilled team at Gerrior Masonry & Landscaping creates durable, beautiful masonry structures built to withstand the New England climate.
For more information on our comprehensive masonry services and how we can bring your vision to life, visit our masonry services page.
Gerrior Masonry & Landscape Construction is based in Woburn, MA, and proudly serves the surrounding communities throughout Middlesex and Essex County, Massachusetts.
The 4 inch cement block price typically ranges from $1.00 to $6.00 per block based on average internet pricing data, not actual costs for Gerrior Masonry & Landscape Construction services. Actual prices will vary by supplier, region, and project specifications.
Standard Hollow CMU Blocks: $1.00 – $3.50 per block (average estimated range from online sources)
Thin Solid Blocks: $1.65 – $5.50 per block (average estimated range from online sources)
Premium Solid Blocks: $4.00 – $12.00 per block (average estimated range from online sources)
Pallet Pricing: $115 – $350 per pallet (70-90 blocks), based on typical internet averages
Planning a project with 4-inch cement blocks requires a clear understanding of the costs involved. This guide breaks down everything from per-block pricing and material types to delivery fees and labor. The final cost depends on block type, supplier, location, and other materials like mortar and rebar.
I’m Joe Gerrior, owner of Gerrior Masonry & Landscape Construction Corp. With over 34 years of experience in Massachusetts, my team and I have managed countless masonry projects, and we’re here to share our insights to help you budget effectively.
Understanding the 4 Inch Cement Block Price and Specifications
The price of a 4-inch concrete block is just one part of your project’s total cost. The block’s specific characteristics, your supplier, location, and order quantity all play a role. You must also budget for materials like mortar and rebar, plus tools and professional labor. For homeowners in Middlesex and Essex County, Massachusetts, understanding these details is key to a successful project.
What is the Average Price of a 4-Inch Concrete Block?
The average 4 inch cement block price is between $1.00 and $6.00 per block. These are broad average cost ranges based on publicly available internet pricing data and are not quotes or actual pricing for Gerrior Masonry & Landscape Construction services; actual prices vary by supplier and location.
Several key factors contribute to this wide price range. Location is a primary driver, as regional differences in raw material costs (cement, sand, aggregate), labor, and transportation directly impact the final price. Supplier type also matters; big-box stores may offer lower per-block prices on standard items, while specialized masonry suppliers provide a wider range of high-quality and specialty blocks at a premium, but often with bulk discounts. Finally, the block’s composition, such as lightweight aggregate (like Haydite) versus standard concrete, will affect its cost.
Standard Hollow CMU Blocks: $1.00 – $3.50 per block (average internet range)
Thin Solid Blocks: $1.65 – $5.50 per block (average internet range)
Premium Solid Blocks: $4.00 – $12.00 per block for specialized finishes or higher strength (average internet range)
Purchasing by the pallet can offer significant savings. A pallet of 70 to 90 blocks typically costs between $115 and $350, lowering the per-block price. These pallet prices are also based on online averages and not Gerrior Masonry pricing. Always ask suppliers about bulk or contractor discounts for large orders. For more on building with these materials, see our guide to cinder block walls.
Block Types, Dimensions, and Weight
Choosing the right block is crucial for your project’s success. The table below compares common 4-inch block types. All price ranges shown are approximate and drawn from internet sources; they are not Gerrior Masonry & Landscape Construction quotes.
Block Type
Nominal Dimensions (W x H x L)
Actual Dimensions (W x H x L)
Approximate Weight
Units per Cube (Pallet)
Typical Use
Price Range (per block, internet averages)
Standard Hollow CMU
4″ x 8″ x 16″
3.625″ x 7.625″ x 15.625″
20-26 lbs
150 (Line Block)
Non-load-bearing walls, partitions
$1.00 – $3.50
Thin Solid Block
4″ x 8″ x 16″
3.625″ x 7.625″ x 15.625″
25-32 lbs
120 (Solid Block)
Veneer, garden edging, small walls
$1.65 – $5.50
Solid “Slug” Block
4″ x 4″ x 16″
3.625″ x 3.625″ x 15.625″
17.5 lbs
216
Small decorative walls, edging
$1.00 – $3.50
Bullnose Block
4″ x 8″ x 16″
3.625″ x 7.625″ x 15.625″
~30-35 lbs
Varies
Rounded corners, decorative features
$3.00 – $10.00
Interlocking/Return Corner Block
4″ x 8″ x 16″
3.625″ x 7.625″ x 15.625″
34.6 lbs
120
Wall corners, complex layouts
$2.20 – $7.00
Haydite Line Block
4″ x 8″ x 16″
3.625″ x 7.625″ x 15.625″
19 lbs
150
Lightweight, non-load-bearing
$1.50 – $5.00
Haydite Solid Block
4″ x 8″ x 16″
3.625″ x 7.625″ x 15.625″
25 lbs
100
Lightweight, non-load-bearing
$2.00 – $6.50
Note: Prices are average estimates from internet sources and can vary by region and supplier. They are not actual Gerrior Masonry & Landscape Construction pricing.
The choice of block type is dictated by the project’s requirements. Standard Hollow CMUs are versatile for interior partition walls or non-structural exterior walls where their hollow cores can be used for insulation or running utilities. Thin Solid Blocks are excellent for creating a durable and attractive masonry veneer over an existing structure, providing the look of a solid wall without the weight.
Solid ‘Slug’ Blocks are shorter and often used for garden bed edging or low decorative walls where a full-height block isn’t needed. For projects requiring finished edges, such as the top of a wall or a window sill, Bullnose Blocks with their rounded corners provide a clean, professional look. Interlocking Blocks are designed for creating strong, stable corners and complex layouts without extensive cutting.
How Does the Price of a 4-Inch Block Compare to Other Sizes?
While the 4 inch cement block price is often lower per unit, it’s important to compare it to other sizes to ensure you’re choosing the right material for the job.
4-Inch Blocks: Most cost-effective for non-load-bearing uses like garden walls or decorative veneers, based on average internet price ranges.
6-Inch and 8-Inch Blocks: These are thicker, heavier, and generally more expensive per block but are required for structural applications. An 8″x8″x16″ block typically costs around $1.25 to $4.50 based on broad internet price data, with actual prices varying widely by supplier.
Key Differences:
Structural Use: 4-inch blocks are for non-load-bearing walls. 6-inch and 8-inch blocks are used for foundations, retaining walls, and load-bearing structures.
Weight: An 8-inch block weighs 28-36 pounds, while a 4-inch block can range from 17-32 pounds. Heavier blocks add strength but can increase labor costs.
Choosing the right size is critical for safety and building code compliance. Our hardscaping services use a range of block sizes to meet specific project needs.
Where to Buy Blocks and Find Certified Masons
Sourcing your blocks and finding a qualified installer are critical steps for your project.
Where to Buy 4-Inch Concrete Blocks:
Big-Box Retail Stores: Retailers like The Home Depot and Lowe’s are convenient for small projects, with prices often ranging from about $1.10 to $6.00 per block depending on the type. These are broad ranges pulled from online listings and are not affiliated with Gerrior Masonry pricing. Always check local store stock and current pricing.
Local Masonry Supply Yards: For larger projects, specialized blocks, or bulk pricing, we recommend local masonry suppliers in Massachusetts. They offer a wider inventory and expert advice.
Finding Qualified Installers:
While some small projects are DIY-friendly, most masonry work requires a professional to ensure durability and safety. When hiring a mason in Middlesex or Essex County, take these crucial steps:
Verify Insurance: A reputable contractor must carry both general liability insurance and worker’s compensation. Ask for a certificate of insurance to protect yourself from liability for accidents on your property.
Get Multiple Itemized Estimates: Don’t just compare the bottom-line price. A detailed, itemized estimate should break down costs for materials, labor, equipment, and cleanup. This helps you compare scopes accurately and spot bids that might be cutting corners.
Review Their Portfolio and References: A portfolio shows their quality of work. Speaking to past clients gives you insight into their professionalism, communication, and reliability. Ask about their experience with projects similar to yours.
Insist on a Written Contract: Never proceed without a comprehensive contract. It should outline the full scope of work, specific materials to be used, a clear payment schedule tied to project milestones, a projected timeline, and warranty details.
Discuss Payment Terms: A common practice is a deposit upfront (typically 10-30%), followed by progress payments. Never pay the full amount before the project is complete and you are satisfied with the work.
Plan Your Masonry Project with Confidence
Understanding the 4 inch cement block price is the first step to a successful masonry project. By planning for all the key factors—block type, supplier, quantity, delivery, and additional materials—you can budget with confidence.
The importance of professional installation cannot be overstated. While 4-inch blocks are often used for decorative elements, proper laying techniques are essential for a durable, polished finish. A poorly built wall can lead to costly repairs. Certified masons bring expertise and adhere to building codes, ensuring your investment is sound.
At Gerrior Masonry & Landscape Construction, we bring over 30 years of experience to every project, from patios and walkways to foundation repairs. Our owner oversight on every job guarantees high-quality results.
For a professional consultation on your next project, explore our comprehensive masonry services.
Gerrior Masonry & Landscape Construction is based in Woburn, MA, and proudly serves the surrounding communities in Middlesex and Essex County, Massachusetts.
Brick fireplace refacing is the process of covering your existing brick with new materials like stone veneer or tile to update its look without the cost and mess of a full demolition.
Quick Overview:
What it is: Applying new materials over existing brick.
Cost: $500-$10,000+ depending on materials and scope (based on internet averages, not actual Gerrior Masonry pricing).
Time: 1-3 days for most projects.
Best for: Updating dated brick, matching new decor, increasing home value.
Materials: Stone veneer, tile, paint, or German schmear.
A fireplace is the focal point of any room, but a dated red brick fireplace can be an eyesore. Chipped bricks and stained hearths can make a beautiful gathering space feel tired.
The good news is you don’t need to tear it out. Refacing your brick fireplace offers a bold, modern change at a fraction of the cost of rebuilding. Whether you want sleek stone veneer or classic painted brick, refacing is an accessible way to transform your space.
The process involves preparing the brick surface and installing your chosen finish. Done correctly, a refaced fireplace can last for decades and add significant value to your home.
I’m Joe Gerrior, owner of Gerrior Masonry & Landscape Construction. With over 34 years in the business, I’ve helped countless Massachusetts homeowners transform their fireplaces through brick fireplace refacing. This guide will walk you through the project from planning to the final touches.
The Complete How-To Guide for Brick Fireplace Refacing
Step 1: Planning Your Brick Fireplace Refacing Project
Proper planning is key to a successful brick fireplace refacing project. Taking time to choose materials and gather tools will prevent costly mistakes.
Your most important decision is the stone veneer. Natural stone veneer is real stone cut thin. It offers unique character and is highly durable but is heavier and more expensive. Manufactured stone veneer is a lighter, more affordable concrete-based alternative that mimics natural stone and comes in consistent colors and shapes.
When selecting your stone, consider your room’s style. A modern space may suit sleek, linear cladding, while a traditional interior might shine with a textured, stacked stone look. For instance, large format tiles or smooth slate panels create a minimalist, contemporary feel. For a rustic or farmhouse aesthetic, consider irregular, fieldstone-style veneers with deep grout lines.
The color palette is also crucial; cool grays and whites lend themselves to modern designs, while warm earth tones like beige, brown, and gold create a cozier, more traditional atmosphere. Don’t forget to consider the existing elements in your room, such as flooring, wall color, and furniture, to ensure a cohesive design.
Next, gather your tools and materials. You’ll need:
Tools: A tile wet saw, notched trowel, measuring tape, level, mixing buckets, and a grout bag.
Materials: Cement board, polymer-modified thin-set mortar, stone veneer, sanded grout, dowel rods for spacers, and brick sealer.
Safety is non-negotiable. Always wear eye and ear protection when using power tools, and use a dust mask to avoid inhaling masonry dust. Protect your floors with heavy-duty paper and hardboard. If you need professional design guidance, check out more info about our Custom Fireplace Builders services.
Step 2: Prepare the Brick Surface for a Lasting Bond
Surface preparation is the most critical step for your brick fireplace refacing project. A poor bond will cause your new veneer to fail.
First, check the structural soundness of your fireplace. Look for significant cracks and tap bricks to check for looseness. If you find major structural damage or heavy creosote buildup in the chimney, stop and call professionals for brick and masonry repair before proceeding.
Protect your space by covering floors and furniture with rosin paper and hardboard. If you’re replacing the mantel or hearth, remove them now. Removing an old hearth is labor-intensive and may require a demolition hammer.
Next, deep clean the brick to ensure optimal adhesion for the new veneer. Your goal is a clean, stable surface free of any contaminants. Start by using a stiff wire brush to scrub away all loose debris, dirt, and soot. For more stubborn grime, a TSP (trisodium phosphate) solution can be effective. When using TSP, mix it according to the manufacturer’s directions and wear appropriate safety gear, as it is a powerful cleaner.
Apply it with a scrub brush, working in small, manageable sections from top to bottom. After scrubbing, rinse the brick multiple times with clean water and a sponge to remove all chemical residue, as any leftover TSP can interfere with mortar adhesion. Allow the brick to dry completely for at least 24-48 hours. Finally, patch any remaining cracks with masonry repair compound before proceeding. For more details on surface prep, see this Step-by-Step Guide to Fireplace Refacing.
Step 3: Cutting and Setting Your Stone Veneer
This is where your vision comes to life, but it requires precision. Rushing here will show in the final result.
Measure your fireplace, calculate the total square footage, and add 10-15% extra material for cuts and waste. Before mixing any mortar, lay out your stone pieces on the floor in a dry fit. This helps you visualize the pattern, plan cuts, and create a balanced appearance. This step is crucial for avoiding awkward-looking small pieces at the edges or corners.
Try to arrange the stones so that you can use full pieces as much as possible, planning your cuts to fall in less conspicuous areas. Mix stones from different boxes to ensure a natural blend of color and texture, as manufactured stone can have slight variations from batch to batch. Take a photo of your final layout for reference once you begin installation.
For cutting, a tile wet saw provides the cleanest, most precise cuts with minimal dust. Always wear safety glasses and gloves. Mix your polymer-modified thin-set mortar to a thick, peanut-butter-like consistency. Only mix as much as you can use within its 30-60 minute pot life.
Start setting stone from the bottom up. Apply mortar to the back of each piece (known as “back-buttering”) and press it firmly onto the brick with a slight twisting motion. Use dowel rods or tile spacers to maintain consistent grout lines. Regularly check your work with a level, both horizontally and vertically, and adjust stones before the mortar sets. Allow the mortar to cure overnight before moving on to grouting.
Step 4: Grouting, Cleaning, and Sealing for a Professional Look
These final steps will protect your new fireplace and give it a polished, professional finish.
Mix your sanded grout and load it into a vinyl grout bag. Squeeze the grout into all the joints, ensuring every gap is filled. Once the grout begins to firm up, use a brick jointer to smooth and compact the grout lines for a clean, uniform look.
Before the grout fully hardens, use a damp sponge to carefully wipe away any excess from the stone faces. For any remaining haze after drying, a 50/50 mix of vinegar and water can work, but test it on an inconspicuous area first.
I highly recommend sealing your stone veneer. A quality brick sealer, applied with a cheap paint brush, improves the stone’s color and protects it from soot and stains. Follow the manufacturer’s instructions for application and drying times.
For safety, always use non-combustible materials for your refacing project and maintain required clearances to combustibles (like wood framing) as specified by local building codes. If you have any concerns about your fireplace’s integrity, consult with experts in stonework repairs.
Finishing Touches and Important Considerations
Common Mistakes in Brick Fireplace Refacing
Being aware of common pitfalls during your brick fireplace refacing project will save you headaches later. Here are the key mistakes to avoid:
Improper Surface Prep: Failing to clean the brick or repair loose mortar will cause your new veneer to fail.
Using the Wrong Mortar: You need a polymer-modified, fiber-reinforced thin-set. Standard mortar can sag or fail to bond properly near a heat source.
Inconsistent Spacing: Eyeballing the gaps between stones looks amateur. Use spacers for a professional result.
Skipping the Dry Layout: Laying out stones on the floor first prevents awkward cuts and ensures a balanced design.
Poor Cuts: Rushed measurements and improper tools lead to jagged, misaligned edges. Measure twice, cut once.
Forgetting Safety Gear: Stone dust and flying debris are serious hazards. Always wear goggles, a dust mask, and gloves.
Ignoring Structural Problems: Covering up significant cracks or loose bricks is a dangerous mistake that will only get worse. For major concerns, seek professional help for Chimney Masonry Repair Near Me.
Ignoring Clearances: Flammable materials like a wood mantel must be a safe distance from the firebox opening to prevent fires. Always follow building codes.
Costs, Alternatives, and Maintenance
The investment for brick fireplace refacing can vary widely.
The Investment You’re Making:
Based on internet averages, a fireplace refacing project can range from $500 to $10,000+.
Budget-friendly ($500-$2,000): Projects like painting with heat-rated paint or adding a simple tile surround.
Mid-range ($2,000-$7,000+): Typically involves installing manufactured or natural stone veneer.
High-end ($7,000-$10,000+): May include custom mantels, large natural stone slabs, or floor-to-ceiling installations.
Painting: The quickest, most budget-friendly option. Use heat-rated paint for a modern farmhouse or contemporary look.
German Schmear: Applying a thin layer of mortar and wiping some away creates a rustic, old-world aesthetic.
Skim Coat: Using limewash or concrete creates a smooth, minimalist finish for modern designs.
Tile: Offers endless design possibilities, from classic subway tiles to decorative mosaics.
Feature
Stone Veneer
Paint
Cost
Mid-to-High ($2,000-$7,000+)
Low ($50-$500)
Durability
High (long-lasting, heat-resistant)
Medium (may chip, require touch-ups)
DIY-Friendliness
Intermediate to Advanced
Easy
Aesthetic
Natural, textured, rustic to modern
Clean, modern, versatile
Keeping Your New Fireplace Looking Great:
Maintenance is straightforward. For regular cleaning, use a soft brush and mild cleaner. Avoid harsh chemicals. Reapply sealant every few years as recommended by the manufacturer. Promptly repair any cracked grout lines to prevent moisture damage. Finally, don’t forget regular chimney inspections and cleaning for safety. Learn more about what’s involved with Chimney Repair Cost.
Wrapping Up: DIY or Call in the Pros?
While brick fireplace refacing can be a rewarding DIY project, it’s wise to call a professional for structural concerns, complex designs, or if you’re unsure about safety and code compliance. Hiring an expert ensures the job is done right, safely, and efficiently.
For a flawless, professional finish, trust the experts at Gerrior Masonry & Landscaping. Our skilled team has over 30 years of experience changing fireplaces throughout Massachusetts. Request an estimate for your fireplace project today, and let’s bring your vision to life.
Gerrior Masonry & Landscape Construction is based in Woburn, MA, and proudly services Middlesex and Essex County, Massachusetts.
Why Hiring a Professional Masonry Contractor in Reading, MA is a Smart Investment
For Masonry Contractor in Reading MA homeowners, finding the right professional can make all the difference between a beautiful, lasting outdoor space and a costly DIY mistake. Knowing how to identify qualified professionals is essential.
Here are 5 proven ways to find a qualified masonry contractor in Reading, MA:
Search online directories like Google Business and Yelp for verified reviews
Ask neighbors and community groups for local recommendations
Verify licenses and insurance including Massachusetts HIC registration
Get multiple detailed quotes with itemized costs and timelines
Check their knowledge of local permits and material options
Reading’s historic New England architecture and harsh seasonal weather—including freeze-thaw cycles—demand experienced masonry professionals who understand both aesthetics and durability. Whether you’re planning a patio installation, chimney repair, or foundation work, the right contractor will ensure your project adds value to your property for generations.
I’m Joe Gerrior, owner of Gerrior Masonry & Landscape Construction Corp. For over 34 years, I’ve provided masonry and landscaping services throughout Massachusetts, including extensive work with homeowners seeking a reliable Masonry Contractor Reading MA can trust. My team’s owner-supervised approach ensures every project meets the highest standards of craftsmanship.
Choosing a professional Masonry Contractor Reading MA is a smart investment in your property. Here’s why a professional touch is indispensable:
Increased Property Value: High-quality masonry is a proven investment. A beautifully constructed patio or a restored chimney enhances your daily life and significantly boosts your home’s market value. In Reading’s competitive market, these features can be a major selling point, often providing a high return on investment.
Improved Curb Appeal: Professional masonry adds timeless elegance and structural beauty. Imagine a charming brick walkway welcoming guests, a stately stone retaining wall creating a terraced garden, or a custom outdoor fire pit as a focal point. These elements transform a house into a distinguished home.
Durability Against New England Weather: Reading’s climate is tough on building materials, from heavy snow and ice to high humidity. Professionals use the right materials and proven techniques—like proper base preparation and high-quality mortar—to ensure your masonry withstands these harsh conditions for decades.
Expertise with Freeze-Thaw Cycles: This is a major threat to masonry in Massachusetts. Water penetrates small cracks, freezes, expands, and breaks the material apart. An experienced Masonry Contractor Reading MA combats this by implementing proper drainage, using specific mortar mixes, and applying appropriate sealants to protect the surface.
Safety and Code Compliance: Masonry work, especially for structural elements like foundations and chimneys, must be done correctly to be safe. A professional ensures every project adheres to Reading’s local building codes. This isn’t just about avoiding fines; it’s about protecting your family from the risks of structural failure or fire hazards.
Professional Craftsmanship vs. DIY Risks: Masonry is a highly specialized trade. Common DIY mistakes—like an improper patio base or the wrong mortar mix—can lead to premature failure and costly repairs that far exceed initial savings. Professional work guarantees a superior, lasting finish that is done right the first time.
We believe a well-executed masonry project is an investment that pays dividends for years. That’s why we bring our decades of experience and owner-supervised approach to every job.
5 Proven Methods for Finding the Best Masonry Contractor Reading MA
1. Leverage Online Directories and Local Reviews
Start your search for a Masonry Contractor Reading MA on platforms like Google, Yelp, and the Better Business Bureau (BBB). Don’t just glance at the star ratings; dive into reviews to identify patterns in communication, punctuality, and quality. Professional responses to feedback are a good sign. Also, tap into community knowledge on local forums like the Reading Residents Facebook Group for candid recommendations from your neighbors.
2. Ask for Local Recommendations and Check Portfolios
Personal referrals are often the most reliable source. Once you have a shortlist, always ask for a comprehensive portfolio. Look for clean lines, consistent mortar joints, and attention to detail. Before-and-after photos are particularly useful. If possible, ask for addresses of recent local projects to see their work in person. Ensure their portfolio includes projects similar to yours, whether it’s a patio installation, paver walkways, or complex foundation work. At Gerrior Masonry & Landscape Construction, we’re proud to showcase our patio design and installation work.
3. Verify Experience, Qualifications, and Insurance for a Masonry Contractor Reading MA
This step is non-negotiable and protects you from risk. Ensure your contractor has:
Experience: Look for a contractor with a long history of quality work in the Reading area. An established presence indicates stability and an understanding of local conditions. We bring over 30 years of experience to every job. Learn about our company history and values.
Licensing: Always verify their Massachusetts Home Improvement Contractor (HIC) license online. An HIC registration provides access to an arbitration program and a guaranty fund in case of disputes.
Insurance: Confirm they carry both general liability insurance (to cover property damage) and workers’ compensation insurance (to cover employee injuries). Without this, you could be held financially responsible for accidents.
Warranties: A reputable contractor is confident in their work and will offer a warranty covering both materials and labor. Understand the terms before signing.
A professional will readily provide this documentation.
4. Get Detailed Quotes and Understand Project Costs
Obtain at least three itemized quotes to compare. A proper quote should break down all costs, including labor, materials, permit fees, and debris removal. Be wary of vague estimates or unusually low bids, as they may signal subpar materials or hidden costs. The cheapest option is rarely the best value. Clarify the project timeline and payment schedule, and never pay for the entire project upfront.
Masonry costs vary widely. The table below shows general industry estimates, not our specific pricing. Always get a personalized quote.
Masonry Service
Average Cost Range in Reading, MA (Internet Data, not Gerrior Masonry prices)
Chimney Repointing
$500 – $5,000+ (for minor repairs to full chimney repointing/rebuild)
Patio Installation
$1,500 – $30,000+ (for small paver patios to large custom stone patios)
Walkway Construction
$800 – $10,000+ (for small paver paths to extensive stone walkways)
5. Discuss Local Regulations, Materials, and Maintenance
Ensure your contractor understands Reading’s specific requirements.
Permits: A good contractor knows exactly which projects (like new retaining walls over a certain height or large patios) require a building permit in Reading and should be able to manage the application process for you.
Materials: They should provide expert advice on the best materials for our climate. Discuss the pros and cons of classic brick for stairs, the timeless beauty of natural stone, or the design versatility of modern pavers. Their recommendations should balance aesthetics, durability, and your budget.
Maintenance: A great project deserves to be protected. Discuss long-term care requirements. This could include periodic sealing of stone patios, how to properly clean efflorescence (white salt deposits), or the importance of scheduling inspections for services like chimney repointing to protect your investment from New England weather.
Gerrior Masonry & Landscape Construction is based in Woburn, MA, and proudly services Middlesex and Essex County, Massachusetts.
Your Next Steps: Common Services and Finding the Right Partner
Now that you know how to find a qualified Masonry Contractor Reading MA, it’s time to consider your project. Here are some of the most popular services we provide to homeowners and businesses in the Reading area.
Popular Masonry Projects for a Masonry Contractor Reading MA
Patios: A well-designed patio installation is more than just a slab of stone; it’s an extension of your home’s living space. We help families create functional and beautiful outdoor rooms, perfect for dining, entertaining, or relaxing. We work with a variety of materials, from classic brick and elegant bluestone to versatile concrete pavers, to create custom patio designs that complement your home’s architecture and lifestyle.
Walkways: Professional paver walkways enhance curb appeal, guide visitors safely to your door, and protect your lawn from foot traffic. We can design walkways in various patterns, such as running bond or herringbone, and finish them with durable edging to ensure a clean, long-lasting look that adds a welcoming and finished touch to your property.
Retaining Walls: In Reading’s varied terrain, retaining walls are both a practical and aesthetic solution. They expertly manage sloped properties, prevent soil erosion, and create level, usable areas for gardens, patios, or play spaces. We engineer and construct walls that are not only beautiful but also structurally sound, incorporating critical drainage systems to ensure longevity.
Fire Pits: An outdoor fire pit or fireplace becomes the natural gathering spot in any backyard, extending your enjoyment of the outdoors well into the cooler New England evenings. We can build a custom fire feature that matches your patio and landscape, ensuring it complies with local safety regulations for a perfect blend of ambiance and peace of mind.
Chimney Work: For Reading’s many historic and older homes, proper chimney maintenance is a critical safety priority. We handle everything from chimney repointing to fix deteriorating mortar joints, to crown repairs and complete rebuilds. A well-maintained chimney not only functions safely but also preserves the architectural character of your home.
Foundation Repair: Addressing foundation cracks or moisture issues at the first sign is essential to protect your home’s structural integrity. Delaying foundation repair can lead to more significant and expensive problems down the road. Our team can diagnose the cause of the issue, whether it’s hydrostatic pressure or settlement, and implement the correct, lasting repair.
Bulkhead Replacements: A leaky, rusted, or poorly fitting bulkhead can be a major source of water in your basement. We install new, watertight bulkhead doors and surrounding masonry that provide secure, easy access to your basement while protecting it from the elements and improving your home’s energy efficiency.
Commercial Snow Plowing: For local businesses, reliable snow and ice management is non-negotiable. Our commercial snow plowing in Reading MA services ensure that your parking lots, walkways, and entryways are clear and safe for employees and customers, minimizing liability and preventing business disruptions during winter storms.
Project timelines vary based on complexity, materials, and weather, but we always provide a clear, realistic schedule with our quotes. At Gerrior Masonry & Landscape Construction, our owner oversees every job to ensure our high standards are met, whether it’s a small set of brick stairs or a complex foundation issue.
Fireplace refacing ideas can transform your dated hearth into a stunning focal point without the mess and expense of a full renovation. Here are the top options to consider:
Paint or Whitewash Brick – Budget-friendly update that brightens and modernizes
Stone or Tile Veneer – Adds texture and elegance with materials like stacked stone, marble, or porcelain
Shiplap or Wood Accents – Creates a farmhouse or contemporary look
Concrete Finish – Delivers an industrial, modern aesthetic
German Schmear – Softens harsh brick with a textured, European-inspired treatment
As the centerpiece of your living space, an outdated fireplace can make the entire room feel off. Refacing offers a practical way to update this focal point, often in just a weekend, while potentially increasing your home’s resale value by 5-10%.
The average cost to reface a fireplace is $1,000 to $5,000, depending on materials and complexity. DIY options like painting can save up to 50% on labor, while professional installation ensures a polished finish for complex projects.
I’m Joe Gerrior, owner of Gerrior Masonry & Landscape Construction Corp. For over 34 years, I’ve helped Massachusetts homeowners transform their fireplaces with expert masonry and creative fireplace refacing ideas. From installing stone veneer to repairing brick, I’ve seen how the right update can revitalize a home’s interior.
Gerrior Masonry & Landscape Construction is based in Woburn, MA, and services Middlesex and Essex County, Massachusetts.
Inspiring Fireplace Refacing Ideas: Top Materials and Styles
The right material can completely transform your fireplace. Whether you’re drawn to rustic textures or sleek modern lines, there’s a material that will make your fireplace the star of the room.
Popular Materials for a Fresh Look
Natural stone like granite or marble brings timeless elegance. A floor-to-ceiling installation creates a dramatic, organic focal point. While an investment, its character and durability are best.
Stone veneer offers the look of natural stone at a fraction of the weight and cost. Stacked stone veneer is one of our most requested materials, delivering authentic appeal without the structural concerns of solid stone.
Tile offers endless possibilities. Ceramic and porcelain come in any color, pattern, or texture. Large format porcelain tiles create a clean, minimalist vibe with fewer grout lines, while intricate mosaic patterns can turn your fireplace into an artistic statement.
For an edgier, industrial feel, concrete finishes or microcement deliver a modern punch. Microcement is practical, as it can be applied over existing brick or tile, creating a smooth, sophisticated surface without demolition.
Wood and shiplap bring a warmth that harder materials can’t match. Shiplap creates clean horizontal lines perfect for farmhouse or coastal styles, while a reclaimed wood mantel adds instant character. For more creative approaches, check out our custom fireplace builders or browse designs by Regan Baker for modern inspiration.
The key is choosing materials that handle the heat and match your home’s personality. The fireplace refacing ideas that work best are authentic to your space. Our fireplace design ideas page has more inspiration.
How to Update a Brick Fireplace
A dated brick fireplace is one of the easiest surfaces to update without messy demolition.
Paint is the quickest, most budget-friendly option. A coat of white paint can brighten a room, while black adds bold sophistication. Just be sure to use heat-resistant paint near the firebox and prep the brick properly for adhesion.
Whitewash or limewash techniques soften the brick without completely covering it, letting the original texture show through. These breathable finishes create a lighter, aged appearance that feels organic and effortless.
German Schmear is my personal favorite. This technique involves spreading wet mortar over the brick and wiping some away to create an old-world, European charm. The tutorial from Craftivity Designs walks you through the process.
For a more dramatic change, you can cover the brick entirely. Tiling over brick with ceramic, porcelain, or natural stone opens up endless design possibilities. A critical warning: if your brick is painted, remove the paint first, or your new tile may peel off with it.
Stone or brick veneer provides a completely new facade without demolition. You can apply it right over existing brick for a fresh start. Our fireplace veneer installation complete guide covers this process. If you have underlying damage, our brick fireplace repair services can fix it before refacing.
Modern and Timeless Fireplace Refacing Ideas
Modern fireplace design creates impact through simplicity. The best fireplace refacing ideas are bold yet uncluttered.
Floor-to-ceiling designs make a big statement, especially with high ceilings. Extending stone veneer or large tiles upward draws the eye and creates an impressive focal point that commands attention.
The minimalist aesthetic lets quality materials speak for themselves. Think smooth plaster, honed marble, or simple concrete surrounds with clean lines and subtle textures for a serene, sophisticated look.
Large format tiles with sleek lines are popular for good reason. They minimize grout lines for a smooth, contemporary surface. In neutral tones, they create a gallery-like quality.
Contrasting materials add visual interest. A dark stone surround against white walls creates drama, while a warm wood mantel balances the coolness of concrete or stone.
Your mantel choice is important. Floating mantels offer a clean, weightless look, while reclaimed wood mantels bring warmth and history. Some modern designs skip the mantel entirely.
Built-in benches are both practical and beautiful, offering cozy seating and storage. We also help clients add integrated storage, like recessed boxes for media equipment, to keep the area clean and uncluttered.
For more ways to make your fireplace work for your lifestyle, explore our fireplace design ideas for inspiration.
Planning Your Fireplace Makeover
A fireplace refacing project is exciting, offering dramatic results without a full-scale renovation. But before you begin, it’s important to understand the costs, benefits, and process to set yourself up for success.
What to Expect: Cost and Benefits
Fireplace refacing is a smart investment that pays dividends beyond just aesthetics. Updating your fireplace can increase your home’s resale value by an estimated 5-10%. In Middlesex and Essex County, a refreshed fireplace is a major selling point that adds to the cozy New England ambiance buyers love.
Beyond resale value, refacing transforms your living space into a warm, inviting atmosphere that reflects your personal style. It turns a central feature into something you’re proud of.
Regarding the investment, internet data shows the average cost to reface a fireplace is between $1,000 and $5,000. This range can extend from a few hundred dollars for a simple paint job to $15,000 or more for elaborate designs with premium materials. Key cost factors include your material choice, labor costs, and overall project complexity. We always recommend getting a detailed estimate before starting professional work.
DIY-Friendly vs. Professional Installation
Whether to DIY or hire a pro depends on your skill level, budget, and project goals. For the handy homeowner, DIY can be rewarding and save up to 50% on labor. Approachable fireplace refacing ideas include:
Painting or whitewashing brick, which can transform a fireplace in a weekend.
German Schmear techniques, which are surprisingly forgiving.
Peel-and-stick tiles for non-wood-burning fireplaces.
Installing a new wood mantel with basic carpentry skills.
However, professional help is crucial for certain jobs. Structural changes, like altering the firebox, require a masonry professional to ensure safety and code compliance. Complex tiling or stone work also benefits from an expert’s precision and specialized tools, as mistakes can be costly. A professional understands the safety standards required for work involving heat and ventilation. At Gerrior Masonry, our Masonry Service ensures your project is not just beautiful—it’s safe and built to last.
Getting Started: Preparation and Next Steps
Proper preparation is key to a great result, whether you’re going DIY or hiring a pro.
First, thoroughly clean the existing surface to remove all soot, dust, and debris. Use a wire brush and a strong cleaner like TSP. This is critical, as new materials won’t adhere to a dirty surface.
Next, inspect for damage like cracks or crumbling mortar. These structural issues must be fixed first. Our Fireplace Mortar Repair services can restore integrity before you begin.
Remove any loose elements you plan to replace, like old mantels. If you’re tiling over painted brick, remove as much paint as possible to ensure your new tile adheres properly. Finally, protect your space with drop cloths and plastic sheeting to make cleanup easier.
When choosing your materials, let your room’s aesthetic be your guide. A rustic space might call for stone veneer, while a modern room may suit large format porcelain tiles. If you’re in Middlesex or Essex County, Massachusetts, and need expert guidance, we’re here to help. At Gerrior Masonry & Landscape Construction, we’ve spent over three decades perfecting our craft. My team and I deliver high-quality results with hands-on oversight on every project, ensuring your fireplace is both beautiful and built to last.
Over time, exposure to the elements can cause brick, stone, and mortar to deteriorate. Professional masonry repair services address this damage, restoring both the structural integrity and aesthetic appeal of your property. Whether you’re dealing with minor cracks or significant structural issues, timely repairs are crucial to prevent further damage.
What You Need to Know About Masonry Repair:
Common repairs include: Repointing/tuckpointing, brick replacement, chimney repairs, and foundation work.
Average project costs (from public internet sources; not actual Gerrior pricing): Reported averages often fall around $1,500–$2,000, with a wide range from roughly $300 on the low end to $6,000–$8,000+ for extensive structural work. Actual costs vary by scope, materials, and site conditions.
Signs you need repair: Look for cracked bricks, crumbling mortar, water leaks, bulging walls, or a white powdery residue (efflorescence).
Timeline: Minor jobs may take a few days, while extensive restoration can take weeks.
Best time to repair: Spring is ideal, after the freeze-thaw cycle has ended.
Ignoring masonry problems allows water infiltration, which can lead to mold, structural instability, and more expensive repairs down the road. Choosing the right contractor is key. Look for licensed, insured professionals with a proven track record. I’m Joe Gerrior, owner of Gerrior Masonry & Landscape Construction, and for over 34 years, my team and I have been providing expert masonry repair services to homeowners and businesses throughout Massachusetts.
Hiring a Masonry Contractor
Choosing the right contractor is paramount for your property’s masonry. You’re entrusting them with the structural integrity, aesthetic appeal, and long-term value of your investment.
Finding a reputable masonry repair services contractor starts with careful vetting. Look for companies with a proven track record. Our 34 years serving Massachusetts speaks to the quality of our work and the trust our clients place in us.
Checking licenses and verifying insurance is a top priority. A legitimate contractor will be licensed and carry both liability insurance and workers’ compensation. We are always ready to provide documentation for your peace of mind.
Reviewing portfolios provides tangible evidence of craftsmanship. Ask to see photos of completed projects similar to yours to ensure they can deliver the quality you expect. We are proud of every project we complete and maintain a full portfolio.
Asking for references is equally important. A reputable contractor will connect you with satisfied customers who can speak to their reliability and professionalism. These conversations reveal how a company operates.
Written estimates are essential. A detailed estimate should clearly outline all costs, materials, labor, and the full scope of work. This prevents misunderstandings and protects both parties. We always provide comprehensive written estimates.
Pay attention to communication. Do they listen, explain their process clearly, and answer questions patiently? These soft skills are just as important as technical expertise for a positive working relationship.
Once you hire a professional for masonry repair services, the process generally follows a clear path to ensure quality results.
Assessment and Planning: The process begins with a thorough assessment to identify not just the visible damage but also its root cause, such as water infiltration or foundation settling. This allows for a comprehensive repair plan. We also focus on sourcing materials—bricks, stone, and mortar—that perfectly match your existing structure for a seamless finish.
Preparation and Removal: Before repairs begin, we prepare the site by setting up scaffolding and protecting your landscaping and property. Our team then carefully removes only the damaged bricks and deteriorated mortar, preserving the integrity of the surrounding structure.
Repair and Application: This is where craftsmanship is key. We mix fresh mortar to the correct consistency and color. New bricks or stones are set, and joints are repointed with precision to ensure structural strength and proper water shedding.
Curing and Cleanup: The new mortar must cure properly to achieve maximum durability; this step cannot be rushed. After the curing period, we conduct a final cleanup, removing all debris and leaving your property pristine. Our goal is to leave your masonry stronger and more beautiful than we found it, as seen in our front stairs and steps projects.
Key Questions to Ask Potential Contractors
Before you commit to any masonry repair services, arm yourself with the right questions to gauge a contractor’s expertise and professionalism.
How long have you been in business, and what’s your experience with projects like mine? A long history suggests stability and expertise with local masonry challenges.
Are you licensed, bonded, and insured? This is non-negotiable. A professional contractor must carry liability insurance and workers’ compensation to protect you, your property, and their team.
Can I see a portfolio and speak with references? Seeing past work and talking to previous clients provides tangible proof of their craftsmanship and reliability.
What is your process for matching mortar color and texture? Proper mortar matching is crucial for seamless repairs that blend with the original work, especially on older or historic properties.
How will you protect my property during the repair? Masonry work can be messy. Ask about their plan for protecting landscaping, windows, and other features from dust and debris.
What is the estimated timeline and what might cause delays? A clear timeline helps manage expectations. Understand that weather or unforeseen issues can cause potential delays.
Do you offer a warranty on your work? A confident contractor stands behind their craftsmanship. Ask what the warranty covers and for how long.
Will you provide a detailed written estimate? Always get a written estimate that outlines all costs, materials, labor, and the full scope of work to prevent misunderstandings.
What is the payment schedule? A standard schedule involves a deposit, progress payments, and a final payment upon completion. Never pay the full amount upfront.
Does the estimate include cleanup and debris removal? Confirm that the quoted price includes complete worksite cleanup and disposal of old materials.
What potential complications do you foresee? An experienced contractor can anticipate challenges and explain how they would resolve them, demonstrating honesty and expertise.
Which specific materials will you use? Ask about the type of brick, stone, and mortar mix. The right materials are critical for a durable and aesthetically pleasing repair.
Asking these questions helps you select a qualified professional who delivers quality results. Our expertise extends beyond repairs to creating beautiful outdoor spaces. Explore our comprehensive hardscaping services for more inspiration on how we can transform your property.
Choose Gerrior for Your Masonry Repair Needs
When your property’s masonry shows signs of distress, you need a team that combines experience, skill, and a deep understanding of local conditions. At Gerrior Masonry & Landscape Construction, we are that team. We’ve built our reputation on providing exceptional masonry repair services that stand the test of time.
For over 30 years, we’ve been helping property owners throughout Middlesex and Essex County tackle their masonry challenges. Our owner, Joe Gerrior, brings over 34 years of hands-on experience to every project. What truly sets us apart is Joe’s personal involvement—he oversees every single job from start to finish. This isn’t just about quality control; it’s about catching potential issues before they become expensive problems. When the owner is on-site, you get craftsmanship that reflects decades of expertise, not just another crew rushing through another job.
We understand that your property represents a significant investment, whether it’s your home or your business. That’s why we approach every masonry repair service with the same level of care and attention to detail. From the moment we assess your damage to the final cleanup, we’re committed to delivering work that improves both the structural integrity and visual appeal of your property.
Our specialties include decorative brickwork and stonework, comprehensive chimney repairs, and foundation repair services. We don’t just patch problems—we identify and address the underlying causes. Water damage, frost heave, settling foundations—we’ve seen it all and know exactly how to fix it for the long term.
Living and working in Massachusetts means dealing with harsh winters, freeze-thaw cycles, and ground movement. We’ve spent three decades learning how local weather patterns and soil conditions affect masonry structures. This regional expertise allows us to tailor our solutions specifically for the challenges your property faces. We use only high-quality materials and proven techniques, all backed by our workmanship guarantee.
Whether you need a few bricks replaced, extensive repointing of your foundation, a complete chimney rebuild, or beautiful new hardscaping services to complement your repairs, we handle it all. We also offer prompt, dependable service with honest, upfront estimates—no hidden fees, no surprises.
If you’re in the Reading area and searching for a trusted partner, you can learn more about our local masonry contractor services in Reading, MA. We’re proud to serve communities throughout our service area with the same commitment to excellence that’s defined our business for over three decades.
Ready to restore your masonry to its former glory? Contact us today for a free consultation. Let us show you why property owners throughout Massachusetts have trusted Gerrior Masonry & Landscape Construction for more than 30 years. We’re here to help you build your dreams, one brick at a time.
Gerrior Masonry & Landscape Construction is based in Woburn, MA, and services Middlesex and Essex County, Massachusetts.


 versus Type N mortar (1 part cement, 1 part lime, 6 parts sand, 750 psi strength, for decorative and non-load-bearing walls) with icons representing different wall applications - best mortar mix for rock wall infographic 2_facts_emoji_nature")


, supplier type (big box stores $1-2 per block vs specialty suppliers $2-6 per block), location and delivery fees ($60-200+), order volume (bulk discounts available), material composition (standard concrete vs lightweight), and additional costs like mortar, rebar, and installation labor - 4 inch cement block price infographic")


, 2. Cost estimate based on square footage and materials needed, 3. Contractor vetting checklist (license, insurance, portfolio review), 4. Repair stages (assessment, preparation, damage removal, mortar application, curing, cleanup), 5. Timeline expectations by project type - Masonry repair services infographic pyramid-hierarchy-5-steps")

